Creating Magical Holiday Moments: The Ultimate Guide to the Fox in a Cup Christmas Candy Dome
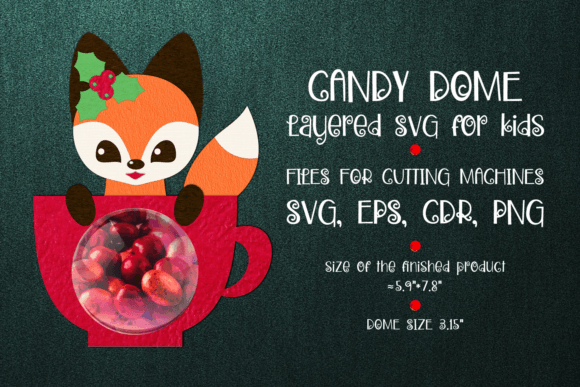
The holiday season is a time defined by warmth, generosity, and the joy of giving. For crafters, DIY enthusiasts, and small business owners, this period offers a unique opportunity to blend creativity with tradition. One of the most charming trends to emerge in recent years is the Fox in a Cup Christmas Candy Dome. This delightful project combines the whimsical appeal of woodland creatures with the nostalgic fun of party favors, resulting in a keepsake that brings smiles to children and adults alike. Whether you are looking to create a special gift for a classroom party, a favor for a winter wedding, or a product to sell in your online shop, understanding how to utilize digital files for this project is essential.
This guide will walk you through everything you need to know about the DIGITAL PRODUCT Download for the Christmas Fox in a Cup Candy Dome. We will explore the purpose of these files, their significance in modern crafting, and provide a step-by-step approach to ensuring your final product looks professional and polished.
Understanding the Digital Product: More Than Just a File
At its core, the Fox in a Cup design is a cute party favor concept brought to life through digital fabrication. When you purchase this item, you are not buying a physical object; rather, you are acquiring a set of files for cutting machines. These digital assets serve as the blueprint for your creation. In today's maker culture, digital downloads have revolutionized how we approach hobbies and small businesses. They allow for instant access, unlimited reproduction, and the flexibility to customize materials to suit specific needs.
The significance of this specific design lies in its versatility. The "fox in a cup" motif taps into the popular aesthetic of cozy winter themes and animal-centric decor. By placing a printed fox illustration inside a clear dome filled with candy, you create a three-dimensional scene that feels like a miniature snow globe. This transforms simple sweets into a memorable experience, elevating a standard treat into a thoughtful gesture.
The Importance of File Formats and Compatibility
One of the most critical aspects of working with digital cut files is ensuring you have the appropriate software to work with these file formats. The package for the Christmas Fox in a Cup typically includes a robust selection of formats to accommodate various machines and skill levels:
- CDR (CorelDRAW): Ideal for users of CorelDRAW software, offering precise vector editing capabilities.
- EPS (Encapsulated PostScript): A universal vector format compatible with Adobe Illustrator, Inkscape, and many other professional design programs.
- SVG (Scalable Vector Graphics): The gold standard for home crafting machines like Cricut and Silhouette. SVG files maintain quality at any size and allow for layer manipulation.
- PNG Preview: A raster image file useful for visualizing the final product or using in sublimation projects where cutting is not required.
Understanding these formats prevents frustration before you even begin. If you own a Cricut Maker or Explore, the SVG file is your best friend. If you use a Silhouette Cameo, you might prefer the EPS or convert the SVG within the Silhouette Studio software. Always verify your machine's compatibility before purchasing to ensure a smooth workflow.
Step-by-Step: From Download to Finished Favor
Once you have downloaded the package, the real fun begins. However, digital crafting requires attention to detail, particularly when dealing with multi-layered designs intended for print-and-cut applications. The Fox in a Cup design usually features 2 separate layers for print cut. This separation is intentional, allowing you to print the colorful fox illustration on one layer and cut the structural elements or backing on another.
Here is a logical workflow to help you achieve the best results:
- Preparation: Unzip your downloaded folder and locate the SVG file. Open your design software (e.g., Cricut Design Space, Silhouette Studio, or Illustrator).
- Importing: Upload the SVG file into your workspace. You should see the distinct layers representing the fox, the cup, and the circular base.
- Material Selection: Choose high-quality cardstock for the cup structure and glossy photo paper or sticker paper for the fox illustration. The contrast in textures adds depth to the final dome.
- The Critical "Attach" Step: This is where many beginners encounter issues. Attention: After uploading the SVG file to Design Space (or equivalent), you must manage the layers carefully to ensure the cut lines align perfectly with the printed image.
- Select the lowest layer (usually the background or base circle).
- Hold the shift key and select the layer with the dotted line intended for the circle cut out.
- Click the Attach button. This action tells the machine to cut the shape exactly where it appears on the screen relative to the printed image, preventing misalignment.
- Printing and Cutting: Send the file to your printer first. Once dry, load the printed sheet into your cutting machine. Ensure the sensors can read the registration marks if you are using a Print-Then-Cut feature.
- Assembly: Fold and glue the cup structure, place your chosen candies inside, insert the fox pick, and seal it with the clear plastic dome.
Common Misunderstandings and How to Avoid Them
A frequent assumption among new crafters is that uploading a file guarantees an immediate perfect cut. In reality, the software settings play a massive role. For instance, failing to use the Attach function often results in the machine cutting the circle in a default location, completely missing the printed fox. Another common error involves paper weight; using paper that is too thick for the "print then cut" sensor can cause the machine to fail reading the registration marks. Always test with a small scrap piece of your intended material first.
Furthermore, some users misunderstand the licensing terms of digital products. While these files are excellent for personal use and often allowed for small commercial use (selling finished physical items), reselling the digital files themselves is strictly prohibited. Respecting intellectual property rights ensures that designers can continue creating wonderful resources for the community.
The Role of DIY in Modern Celebrations
In an era dominated by mass-produced goods, there is a growing appreciation for handmade items. Creating a Fox in a Cup Christmas Candy Dome fits seamlessly into modern life by allowing individuals to add a personal touch to their celebrations. For educators, these make fantastic rewards for students. For parents, they are a meaningful activity to do with children during winter breaks. For entrepreneurs, they represent a low-overhead, high-margin product for holiday markets.
The process also fosters technological literacy. By engaging with vector files, learning about layer management, and operating computerized cutting machines, crafters develop valuable skills that bridge the gap between art and technology. It demystifies the design process, showing that with the right tools and knowledge, anyone can produce professional-grade results.
Expanding Your Creative Horizons
While the fox theme is perfect for Christmas, the underlying technique of creating domed candy favors is applicable year-round. Once you master the workflow of printing, attaching layers, and assembling the dome, you can apply these skills to birthdays, baby showers, and corporate events. The Cute party favor concept is evergreen; only the graphics change.
To further enhance your projects, consider experimenting with different fillers. Instead of traditional hard candies, try mini marshmallows, chocolate coins, or even non-edible trinkets like erasers for a school setting. You can also customize the cup colors to match specific party themes, demonstrating the incredible flexibility of the digital format.
Conclusion
The Fox in a Cup Christmas Candy Dome is more than just a craft project; it is a vehicle for creativity, connection, and holiday spirit. By leveraging high-quality files for cutting machines and understanding the nuances of file formats like CDR, EPS, SVG, and PNG, you can create stunning favors that stand out. Remember the crucial step of selecting the lowest layer and the dotted line layer to click attach—this small action makes the difference between a frustrating failure and a flawless finish.
Whether you are a seasoned designer or a beginner picking up a cutting mat for the first time, this digital product offers a gateway to endless possibilities. Embrace the learning curve, enjoy the process of making, and share the warmth of the season with your handmade creations. Happy crafting!