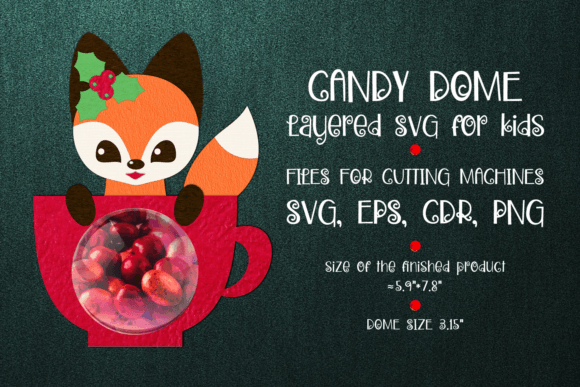
Creating Magical Holiday Memories: A Guide to the Deer in a Cup Christmas Candy Dome Paper Craft
The holiday season is synonymous with creativity, warmth, and the joy of giving. In recent years, there has been a significant shift toward personalized, handmade gifts that carry a unique touch of love. One such trend that has captured the hearts of crafters and gift-givers alike is the Deer in a Cup Christmas Candy Dome. This charming project combines the nostalgia of classic holiday imagery with the modern convenience of digital crafting technology. By utilizing a DIGITAL PRODUCT Download for the Deer in a Cup Candy Dome Christmas Ornament Paper Craft Template, enthusiasts can create stunning sucker holders that serve as both delightful treats and beautiful decorations.
This article aims to demystify the process of creating these intricate paper crafts. Whether you are a beginner looking to try your hand at die-cutting machines or an experienced crafter seeking to streamline your holiday production, understanding the nuances of this project will enhance your creative journey. We will explore the purpose of these templates, the technical requirements needed to bring them to life, and the step-by-step process to ensure a perfect result every time.
Understanding the Appeal of 3D Paper Craft Ornaments
At its core, the Deer in a Cup design is more than just a container for candy; it is a miniature winter scene encapsulated in paper. The concept involves creating a three-dimensional structure where a festive deer figure appears to be standing inside a clear cup or dome, often holding a lollipop or surrounded by small treats. This visual trickery creates a sense of depth and whimsy that flat cards or standard gift bags simply cannot achieve.
The significance of such projects lies in their versatility. They fit seamlessly into various aspects of modern life and celebration. For parents, they are a fun educational activity to do with children, teaching fine motor skills and spatial reasoning. For small business owners and Etsy sellers, these templates represent a viable product line that offers high perceived value with relatively low material costs. In educational settings, they can be used to teach geometry through the folding and assembly of 3D shapes. The "candy dome" aspect adds an interactive element, turning the ornament into a functional party favor or classroom reward.
The Role of Digital Templates in Modern Crafting
Gone are the days when crafters had to draw complex patterns by hand or trace images from books. The advent of SVG (Scalable Vector Graphics) and other digital file formats has revolutionized the industry. When you download the Deer in a Cup Candy Dome Christmas Ornament Paper Craft Template, you are accessing a precision-engineered design that has been optimized for cutting machines like Cricut, Silhouette, and Brother ScanNCut.
These digital files ensure consistency. Unlike hand-drawn patterns, which can vary in size and symmetry, a digital template guarantees that every cut is identical. This is crucial when producing multiple ornaments for a tree or a batch of gifts. Furthermore, digital files allow for scalability. You can resize the deer and the cup to fit different sizes of candy or to create a tiered display of ornaments without losing image quality. This flexibility makes the Sucker Holder SVG a powerful tool for anyone looking to customize their holiday decor.
Technical Requirements and File Formats Explained
Before diving into the cutting process, it is essential to understand the tools and files involved. The package for the Deer in a Cup project typically includes a variety of file formats to accommodate different software and hardware setups. These usually include CDR (CorelDRAW), EPS (Encapsulated PostScript), SVG (Scalable Vector Graphics), and a PNG preview.
- SVG: This is the most common format for home crafting machines. It preserves vector data, allowing lines to remain crisp regardless of scaling.
- EPS: Often used by professional graphic designers using Adobe Illustrator or CorelDRAW, this format is highly compatible with professional printing and cutting workflows.
- CDR: Specific to CorelDRAW users, this native file format ensures that all layers and properties are preserved exactly as the designer intended.
- PNG: While not used for cutting, the PNG preview is vital for visualizing the final product before you commit your materials. It helps you plan your color scheme and layering strategy.
A critical component of this specific template is the inclusion of 2 separate layers for print and cut. This feature is designed for users who wish to print colored designs directly onto cardstock before cutting them out. The "print" layer contains the colorful graphics of the deer and the cup, while the "cut" layer provides the precise outline for the machine to follow. This registration ensures that the cut aligns perfectly with the printed image, preventing white edges or misaligned features.
Software Compatibility and Preparation
To successfully utilize these files, you must have the appropriate software installed on your computer. Most cutting machines come with proprietary software (such as Cricut Design Space or Silhouette Studio) that can import SVG and DXF files. However, if you are working with CDR or EPS files, you may need vector editing software like Adobe Illustrator, Inkscape (a free alternative), or CorelDRAW.
It is a common misunderstanding that any image file can be sent directly to a cutter. Raster images like JPEGs do not contain the mathematical paths required for cutting. Therefore, ensuring you are working with the correct vector formats is the first step toward success. Always verify that your software version supports the specific file type you intend to use.
Step-by-Step Assembly: From Screen to Sucker Holder
Once you have downloaded the files and prepared your software, the real magic begins. The process of transforming a digital file into a physical Deer in a Cup Christmas Candy Dome requires attention to detail, particularly regarding layer management.
- Importing the Design: Open your cutting machine software and upload the SVG file. Take a moment to inspect the layers panel. You should see distinct elements representing the deer, the cup, the base, and the decorative details.
- Configuring the Cut Settings: Select the material you are using—typically heavy cardstock (65lb to 80lb) works best for structural integrity. Set your machine to the corresponding material setting to ensure clean cuts without tearing the paper.
- The Critical "Attach" Step: This is where many beginners encounter issues. The instructions explicitly state: After uploading the SVG file to Design Space, select the lowest layer and the layer with the dotted line for the circle cut out and click attach. Why is this necessary? The "attach" function tells the software to keep the relative position of these two layers fixed during the cutting process. The dotted line usually indicates a fold line or a specific cutout for the candy stick. If you do not attach these layers, the machine might cut them in random positions on your mat, ruining the alignment needed for the 3D assembly.
- Cutting and Weeding: Send the design to your machine. Once cut, carefully remove the excess paper (weeding). Use a weeding tool to poke out the small interior details of the deer's antlers or the lattice work on the cup.
- Assembly: Fold along the scored or dotted lines. Apply a high-quality craft glue or double-sided tape to the tabs. Assemble the cup structure first, then insert the deer figure. Finally, slide the lollipop stick through the designated hole in the base or the deer's hands, securing it so the candy sits snugly within the "dome."
Troubleshooting Common Issues
Even with the best templates, hiccups can occur. If your cuts are not deep enough, check your blade; a dull blade is the most common culprit. If the pieces do not fit together tightly, ensure you selected the correct cardstock weight in your software settings, as this adjusts the pressure applied by the rollers. Another frequent point of confusion is the orientation of the print. Remember that if you are using the print-then-cut feature, your printer must be calibrated correctly with your cutting machine to avoid offset errors.
Expanding Your Creative Horizons
The Deer in a Cup template is merely a starting point. Once you master the technique, you can adapt the concept for other holidays. Imagine a bunny in a cup for Easter, a pumpkin for Halloween, or a heart for Valentine's Day. The underlying mechanics of the Sucker Holder SVG remain the same, but the thematic elements change entirely.
Moreover, these ornaments offer a sustainable alternative to plastic party favors. By using biodegradable cardstock and minimizing plastic packaging, crafters contribute to a more eco-friendly celebration. They also foster community; sharing these digital files or finished products can spark conversations and connections within crafting groups and local communities.
In conclusion, the Deer in a Cup Christmas Candy Dome represents the perfect intersection of tradition and technology. It allows us to preserve the handmade spirit of the holidays while leveraging the precision and ease of digital tools. By understanding the file formats, respecting the software requirements, and following the specific assembly instructions—particularly the vital "attach" command—you can create breathtaking ornaments that bring joy to recipients of all ages. Whether for personal use or small business ventures, this project underscores the endless possibilities available to the modern crafter.