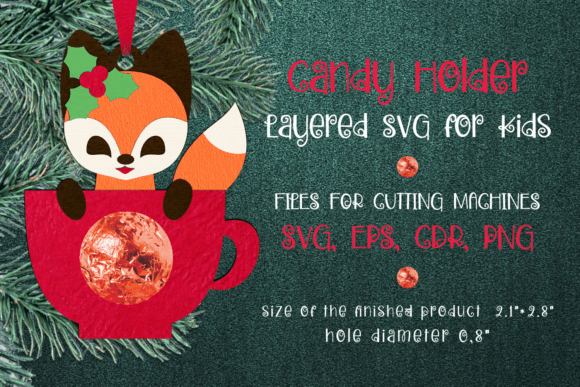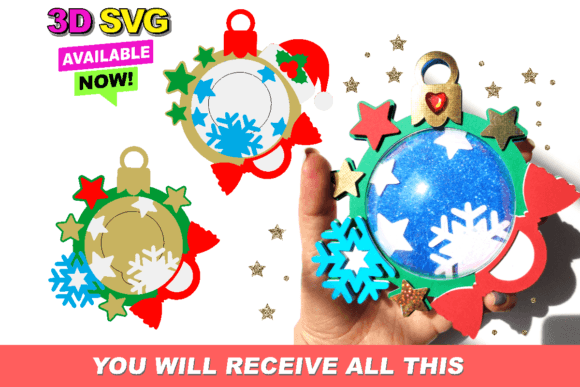
Elevate Your Holiday Decor with a 3D Candy Holder Christmas Ornament
The holiday season is a time for creativity, and few projects bring as much joy as crafting personalized decorations. A Candy Holder Christmas Ornament offers a delightful blend of functionality and festive charm, allowing you to treat guests while adding a unique touch to your tree. These 3D designs are particularly popular because they transform standard flat ornaments into interactive vessels capable of holding small sweets, notes, or tiny gifts. However, diving into digital crafting without a clear plan can lead to frustration. Whether you are a seasoned entrepreneur selling handmade goods or a hobbyist looking to spruce up your home, understanding the nuances of working with these files is essential for success.
When you download a package that includes an SVG in a zipped folder, you are accessing a versatile asset designed for precision cutting. This specific file type is optimized for popular software like Silhouette Studio and Cricut Design Space. Yet, a common misconception among beginners is assuming that all machines handle these 3D structures identically. If you are using another type of machine, please ensure you are able to use this type of file with your machine before purchasing or starting your project. Ignoring compatibility checks often results in wasted material and time, as the intricate tabs and slots required for 3D assembly may not cut correctly on devices not calibrated for such detail.
Avoiding Material Mishaps and Structural Failures
One of the most frequent errors crafters make involves material selection. A Candy Holder Christmas Ornament relies on structural integrity to hold weight without collapsing. Many users mistakenly reach for standard printer paper or thin vinyl, expecting it to support the weight of candies. This approach rarely works; the ornament may buckle at the seams or fail to lock together properly. For the best results, opt for cardstock ranging between 65lb and 80lb. This weight provides enough rigidity to maintain the 3D shape while remaining flexible enough to fold along score lines without cracking.
Furthermore, overlooking the importance of grain direction can compromise your final product. When cutting multiple layers or pieces for assembly, aligning the grain incorrectly can cause the ornament to warp over time, especially if hung near a heat source like a fireplace. Always check the grain direction in your design software before sending the job to your cutter. A simple adjustment here ensures that your ornament hangs straight and looks professional, rather than drooping sadly from a branch.
Mastering the Assembly Process
Even with perfect cuts, the assembly phase is where many projects stall. The complexity of a 3D SVG lies in its interlocking parts. A typical mistake is rushing through the folding and gluing process. Users often apply too much adhesive, causing glue to seep out and ruin the aesthetic, or too little, resulting in a fragile structure that falls apart when filled. The solution is patience and precision. Use a bone folder to create crisp creases before applying any adhesive. For bonding, a quick-dry tacky glue applied sparingly with a toothpick offers superior control compared to broad strokes from a glue stick.
Another overlooked detail is the testing phase. Before committing to a full batch of ornaments, always perform a test cut on a single piece of scrap material. This step verifies that your blade depth, pressure, and speed settings are correct for your specific machine and material combination. It also allows you to practice the assembly sequence, ensuring you understand how the tabs fit into their corresponding slots. This small investment of time prevents the heartbreak of ruining an entire sheet of premium holiday cardstock.
- Check Compatibility: Verify that your cutting machine supports complex 3D SVG files before beginning.
- Select Proper Weight: Use cardstock between 65lb and 80lb for optimal strength and foldability.
- Mind the Grain: Align paper grain to prevent warping and ensure the ornament hangs correctly.
- Test First: Always run a single test cut to calibrate machine settings and practice assembly.
- Precision Gluing: Apply adhesive sparingly using fine tools to maintain a clean, professional look.
Maximizing Versatility for Business and Gifting
For entrepreneurs and small business owners, the Candy Holder Christmas Ornament represents more than just a craft project; it is a potential revenue stream. However, scaling production introduces new challenges. A common pitfall is inconsistent coloring or finishing. When producing in bulk, slight variations in ink density or glue application can become obvious. To maintain high quality, establish a standardized workflow. Create a checklist for each stage of production, from cutting to packaging, to ensure every item meets your brand standards.
Additionally, consider the end-user experience. If you are selling these ornaments, provide clear instructions on how to assemble them. Including a small printed guide or a QR code linking to a video tutorial can significantly enhance customer satisfaction. Buyers appreciate guidance, especially if they are less experienced with 3D papercraft. This added value distinguishes your product from competitors and builds trust with your audience.
Educators and community leaders can also leverage these designs for group activities. The interactive nature of filling the ornament with treats makes it an excellent tool for classroom parties or community gatherings. However, safety is paramount. Ensure that any candies used are appropriate for the age group and free from allergens. Alternatively, encourage participants to fill the ornaments with non-edible items like confetti, beads, or handwritten wishes, expanding the creative possibilities beyond just sweets.
Final Thoughts on Digital Crafting Success
Navigating the world of digital cut files requires attention to detail and a willingness to learn from mistakes. The Candy Holder Christmas Ornament is a fantastic example of how technology and tradition merge to create something special. By respecting the limitations of your equipment, choosing the right materials, and approaching assembly with care, you can avoid common pitfalls and achieve stunning results.
Remember that the download includes an SVG in a zipped folder, which means you must extract the files before importing them into your software. Skipping this extraction step is a frequent technical hurdle that prevents files from loading correctly. Once extracted, take a moment to explore the layers within your design software. Understanding how the vector paths interact will give you greater control over the cutting process.
Ultimately, the goal is to create memories and spread cheer. Whether you are decorating your own home, teaching a class, or building a holiday product line, these 3D designs offer endless potential. Approach each project with curiosity and caution, and you will find that the rewards far outweigh the effort. Happy crafting, and may your holidays be filled with sweetness and style.