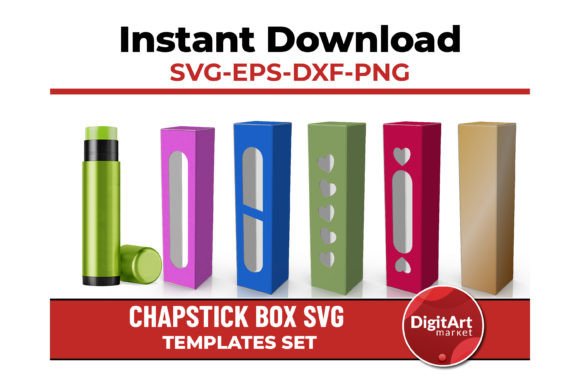
Mastering Chapstick Box and Lip Balm Box Templates for Professional Results
Creating custom packaging is one of the most effective ways to elevate a personal care brand or craft project. Whether you are launching a small business selling organic balms or creating personalized gifts, the presentation matters immensely. Using a Chapstick Box template allows you to achieve a polished, retail-ready look without the high costs associated with professional die-cutting services. However, many creators rush into this process without understanding the technical nuances, leading to wasted materials and frustration. By approaching your design with precision and foresight, you can ensure that every box you produce reflects the quality of the product inside.
Understanding the Value of Precision Templates
A Lip Balm Box Template is more than just a flat image; it is a structural blueprint. The specific dimensions mentioned—2.75 x 0.67 x 0.67 inches (70 x 17 x 17 mm)—are critical because they correspond to standard tube sizes. When you utilize a pre-designed template, you are bypassing the trial-and-error phase of structural engineering. This is particularly valuable for those who may not have extensive experience with CAD software or packaging design.
The inclusion of multiple file formats, such as SVG, EPS, PNG, and DXF, ensures compatibility across various cutting machines and design software. For instance, SVG files are ideal for Cricut Design Space and Silhouette Studio, while EPS files serve as the gold standard for vector editing in Adobe Illustrator or CorelDRAW. Understanding which file type serves your workflow is the first step toward efficiency. Misidentifying your software’s requirements can lead to poor cut lines, misaligned folds, and ultimately, a box that does not assemble correctly.
Common Mistakes in Material Selection and Setup
One of the most frequent errors creators make is selecting the wrong cardstock weight. While it might be tempting to use thin paper to save money or reduce bulk, a chapstick box requires structural integrity. If the material is too flimsy, the box will collapse under the weight of the product or during shipping. Conversely, using material that is too thick can cause cracking along the fold lines, ruining the aesthetic appeal.
Practical Advice: Always test your chosen material with a single prototype before committing to a full production run. Look for cardstock in the range of 80lb to 100lb cover weight. This provides enough rigidity to hold its shape while remaining flexible enough to fold cleanly. Additionally, ensure that your cutting machine’s blade depth and pressure settings are calibrated for the specific material thickness. Ignoring these settings often results in incomplete cuts or excessive tearing.
Navigating File Formats and Software Compatibility
The versatility of receiving five different design options in multiple formats is a significant advantage, but it can also be overwhelming for beginners. A common misunderstanding is assuming that all vector files behave the same way across all platforms. For example, while an SVG file is scalable and editable in many programs, it may lose layer information when imported into certain basic viewers. Similarly, using a PNG file for cutting purposes without checking the resolution can result in pixelated edges, which look unprofessional on a small-scale item like a lip balm box.
If you are using the free version of Silhouette Studio, you must rely on the DXF files provided. Attempting to open an SVG or EPS file in the basic edition will result in error messages or inability to edit the design. This oversight can halt your workflow entirely. Always verify your software’s capabilities before purchasing or downloading templates. If you plan to do extensive customization, investing in the designer edition of your software or using a program like Illustrator that handles EPS files natively is a wise decision.
Design Errors That Compromise Usability
When customizing your CHAPSTICK PACKAGE, it is easy to get carried away with intricate designs. However, over-complicating the visual layout can detract from the box’s functionality. Small text, fine details, and complex patterns may look impressive on a screen but can become illegible or difficult to cut on a physical object of this size. Remember that the surface area of a 2.75-inch box is limited. Cluttering it with too much information or decorative elements can make the product look cheap rather than premium.
Better Approach: Embrace minimalism. Use bold, clear typography for your brand name and essential product details. Leave adequate white space to let the design breathe. This not only enhances readability but also simplifies the cutting and weeding process. If you are using a print-and-cut method, ensure that your design aligns perfectly with the cut lines. Misalignment by even a millimeter can result in cropped text or uneven borders, which significantly impacts perceived quality.
Assembly and Finishing Techniques
Even with a perfect cut, the assembly process can introduce errors. Many users struggle with getting crisp, clean folds. Folding cardstock without scoring it first often leads to ragged edges and uneven corners. Although most high-quality templates include score lines, some users ignore them or fail to adjust their machine to score instead of cut.
To achieve a professional finish, use a bone folder or a blunt tool to press down firmly along the score lines. This creates a sharp crease that allows the box to fold neatly. When gluing the tabs, avoid using too much adhesive. Excess glue can seep out and stain the exterior of the box or cause the paper to warp. A small amount of strong craft glue or double-sided tape applied precisely to the tabs is usually sufficient.
Checking Your Work Before Final Production
Before you commit to producing dozens or hundreds of boxes, perform a thorough quality check. Insert an actual chapstick tube into your prototype. Does it fit snugly without being too tight? Is the box sturdy enough to withstand handling? Check the alignment of your printed design. Are the colors consistent? Is the text readable?
It is also important to consider the end-user experience. How easy is it for the customer to open the box? If the fit is too tight, they may struggle to remove the product, leading to frustration. If it is too loose, the product may rattle around, suggesting low quality. Adjusting the template slightly in your vector software can help you fine-tune the fit based on your specific product dimensions.
By paying attention to these details, you transform a simple LIP BALM BOX SVG TEMPLATE into a powerful branding tool. The goal is not just to create a container, but to create an experience. Every fold, cut, and printed element contributes to the overall perception of your brand. Taking the time to understand the materials, software, and design principles involved ensures that your final product stands out in a crowded market. Whether you are a hobbyist making gifts or an entrepreneur building a business, mastering these fundamentals will save you time, money, and stress in the long run.